What if the only thing standing between your brand and a premium, high-fidelity finish was a single file extension? It’s a common nightmare: you invest in luxury Nike polos or YETI tumblers, only to have the final product arrive with a blurry, jagged logo. Understanding the specific artwork requirements for screen printing isn’t just a technical chore; it’s a strategic move to protect your brand’s visual integrity. We’ve seen too many creative visions get lost in translation because of a simple misunderstanding of vector paths or DPI settings.
We know you want your bulk orders to match your brand guidelines perfectly without the headache of technical jargon or unexpected production delays. That’s why we’ve created this guide to help you master the technical standards required for professional-grade results. You’ll learn exactly how to prep your assets for the latest 2026 software versions, like Adobe Illustrator v30.0, to ensure every print is crisp and vibrant. We’ll walk you through a definitive checklist for your design team, explain the ROI of professional file prep, and give you the confidence to hit “order” every single time.
Your brand is more than a logo. It’s a promise of quality. When you invest in high-end merchandise, the technical foundation of your design determines whether that promise is kept. In the professional world, we call this “print-ready” status. This means the file requires zero modification before it hits the film output stage. Meeting the specific artwork requirements for screen printing ensures your brand assets translate perfectly from a digital screen to a physical product without losing their soul.
Many teams fall into the trap of sending high-resolution screenshots or web-optimized PNGs. While these might look sharp on a retina display, they fail the screen printing test every time. These files lack the mathematical precision needed for clean color separations. Without professional prep, you risk blurry edges and color bleeding that can ruin a bulk order of 500 custom screen printed t-shirts. Professional file preparation is the invisible shield that prevents costly errors and keeps your production timeline on track.
Low-quality files don’t just look bad; they erode trust. Subpar artwork leads to jagged edges and muddy colors that make even the most expensive garment look cheap. It’s about perception. Imagine the impact on employee pride when they’re handed gear with a distorted or faded logo. It doesn’t inspire confidence or loyalty. High-quality execution is vital because your marketing swag ROI is directly tied to whether people actually want to wear and use the items you provide.
Consistency is the hallmark of a premium brand. Whether you’re ordering 50 or 5,000 units, the first shirt must look identical to the last one in the box. This level of precision is why global leaders like Nike and Under Armour maintain such rigid artwork requirements for screen printing for their licensed apparel. They understand that a logo is a signature of excellence.
The history of screen printing shows us that while the tools have evolved from manual frames to high-speed automatics, the need for clean, sharp stencils remains constant. Professional preparation allows us to catch technical errors before the press starts. We use a rigorous digital proofing process to help you visualize the final product. This step ensures that every detail, from line thickness to placement, aligns with your brand guidelines before a single drop of ink touches the fabric.
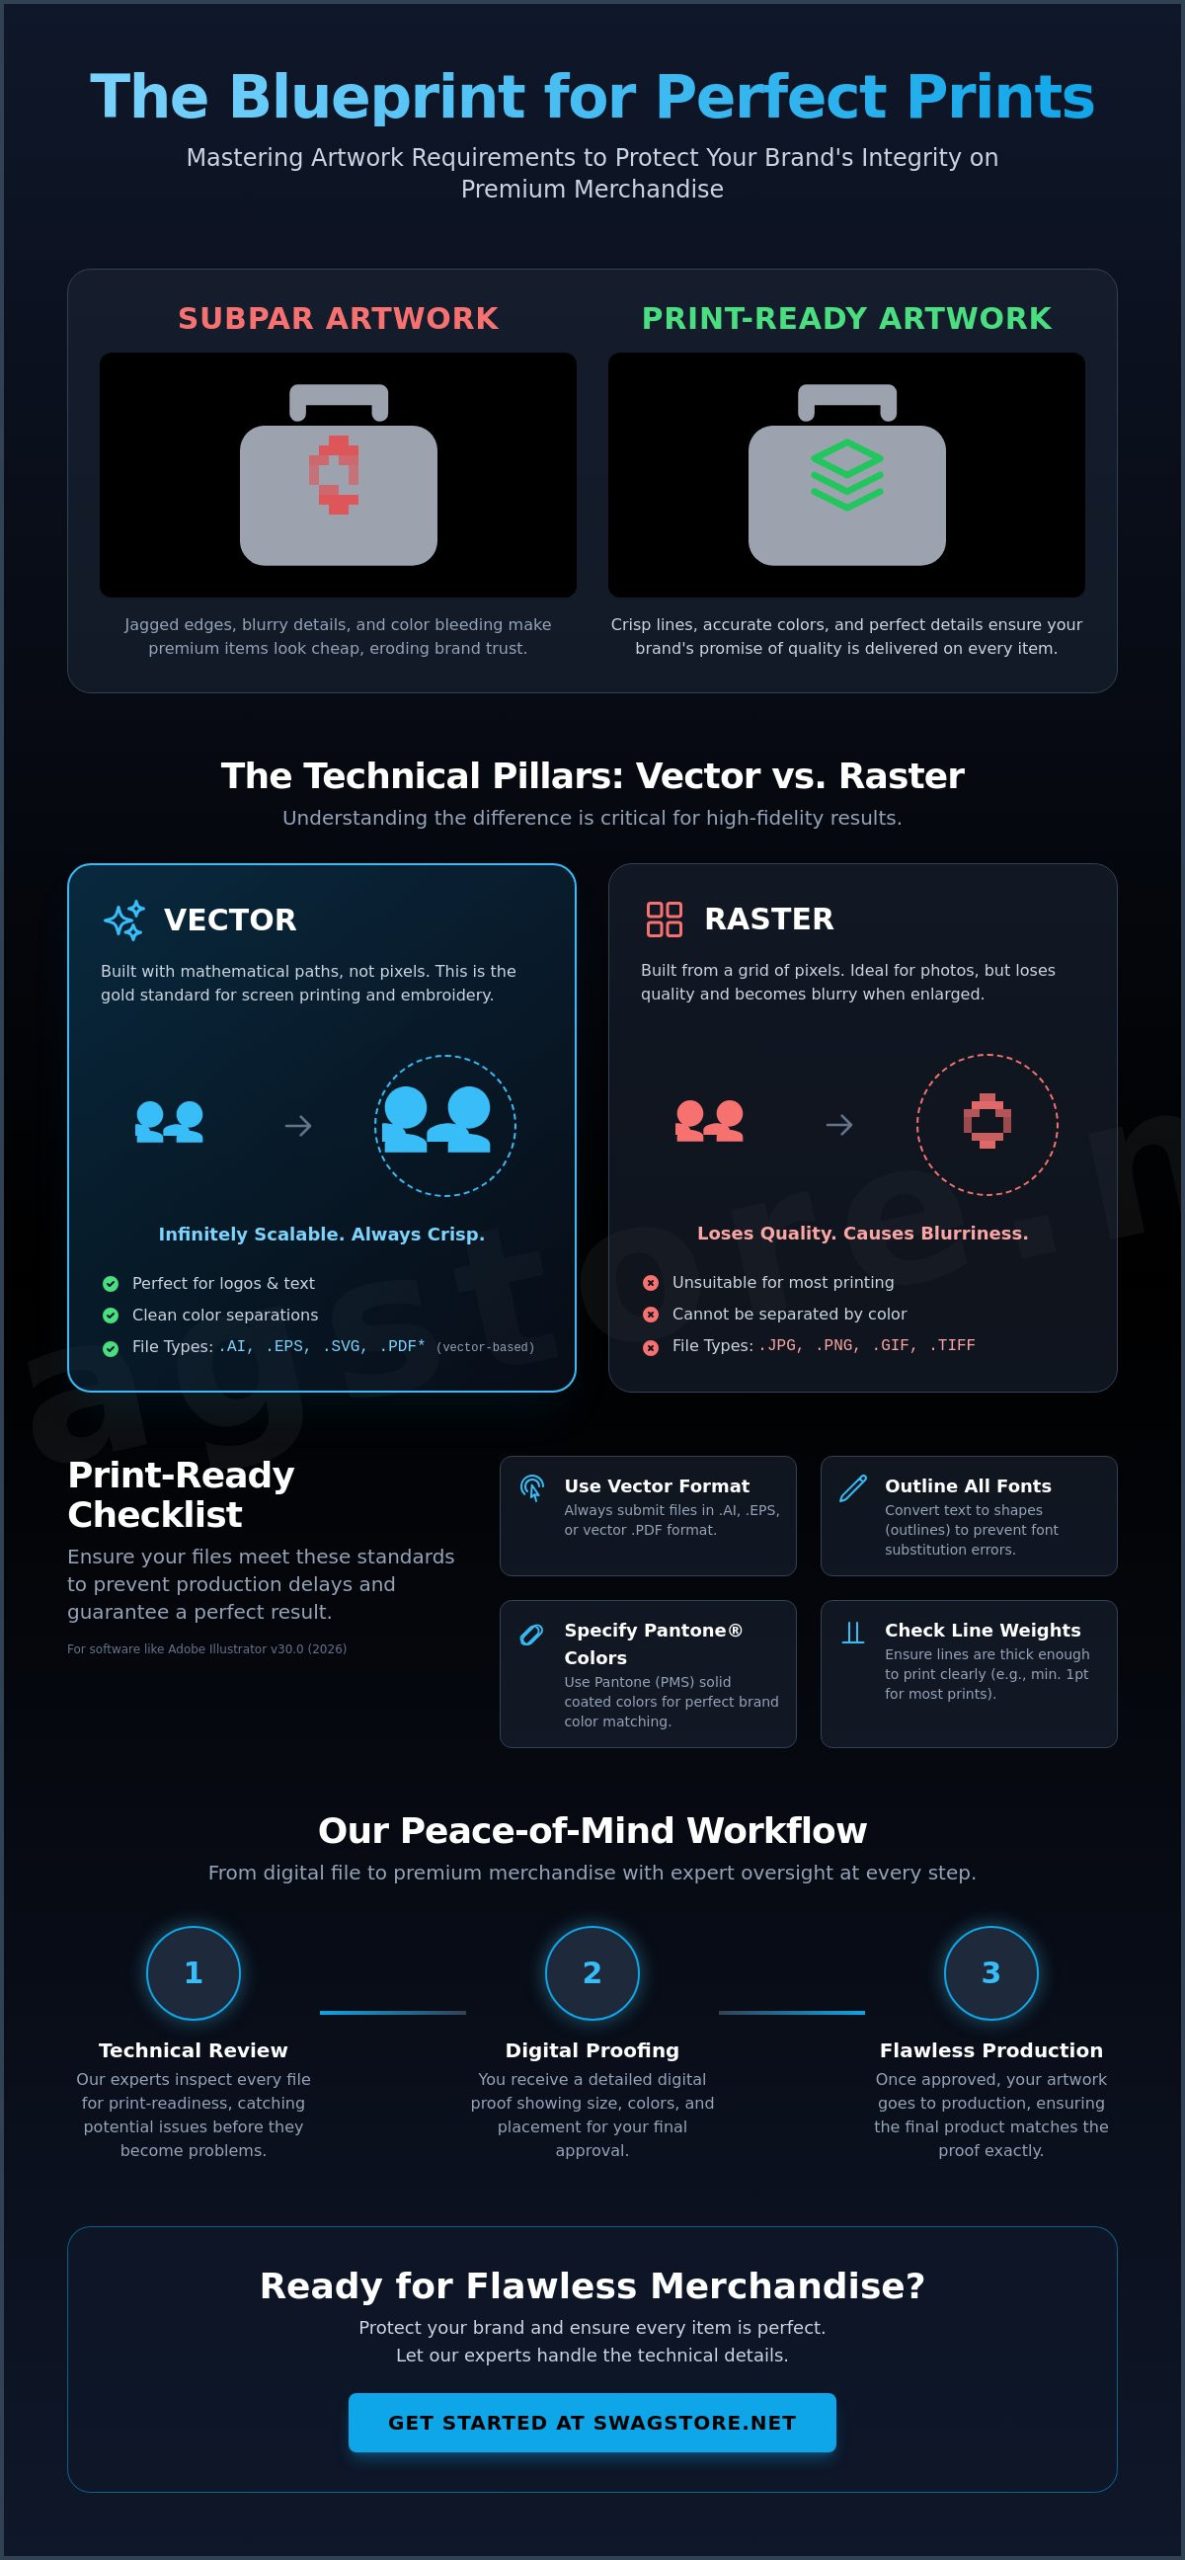
The success of your merchandise depends on how your design is built. Think of digital files as either a set of mathematical instructions or a collection of colored dots. In the world of high-fidelity production, these instructions are what we call vector graphics. They are the industry gold standard for a reason. Unlike raster images, which are made of pixels, vector files use paths to define shapes. This technical distinction is the backbone of all artwork requirements for screen printing because it dictates how sharp your logo will appear on the final product.
While raster files like JPEGs or PNGs are perfect for your website, they often fail the screen printing test. When you enlarge a pixel-based image, it loses clarity and becomes “blocky” or jagged. Vectors avoid this entirely. They offer infinite scalability, meaning the same file used for a laser-engraved pen can be blown up for a massive banner without losing a single ounce of detail. This flexibility is essential when managing bulk promotional items where your logo might appear on everything from a tiny power bank to a large tote bag.
Vector files, typically ending in .AI, .EPS, or .SVG, are the preferred choice because they allow for easy color separation. In Adobe Illustrator 2026, we can isolate every individual color in your design to create the physical screens needed for the press. This process is clean and precise. It ensures that the ink lays down exactly where it should, maintaining the visual weight of your brand assets. If you want to ensure your team’s gear looks professional, starting with vector assets is the single most important step you can take.
There are times when raster files are necessary, specifically for complex, multi-color photographic prints. If your design includes gradients or photographic elements, a high-resolution Photoshop (.PSD) file is your best bet. However, the 300 DPI (dots per inch) rule is non-negotiable. This resolution must be at the actual print size. If your logo is four inches wide on a shirt, the file must be 300 DPI at four inches wide.
Mastering these technical pillars removes the guesswork from your creative process. It ensures that your brand’s transition from a digital concept to a physical reality is seamless, vibrant, and, most importantly, accurate to your original vision.
Professional screen printing is as much about physics as it is about art. Once you’ve secured your vector file, the next hurdle is ensuring the fine details don’t disappear when ink meets fabric. This is where the specific artwork requirements for screen printing become highly granular. We’re looking at how a physical substance, ink, interacts with a textured surface like a custom screen printed t-shirt. Precision at this stage is what separates a standard giveaway from a premium brand statement.
One of the most frequent production delays stems from missing fonts. Even if you have the perfect typeface, our production systems might not. To solve this, designers must use the “Create Outlines” command in Adobe Illustrator. This converts text into mathematical shapes, ensuring your typography looks exactly as intended without needing the original font file. It’s a simple step that guarantees your brand’s voice remains consistent across every piece of merchandise. It also prevents the software from substituting your carefully chosen font with a generic alternative.
Textured materials like heavy cotton or eco-friendly recycled tote bags aren’t as smooth as a computer screen. We recommend a minimum font size of 8pt for legibility. Anything smaller risks “filling in” as the ink settles into the fibers. Avoid ultra-thin serifs or delicate scripts for high-volume runs. These fine lines are prone to breaking or vanishing during the stroke of the squeegee, leading to a loss of detail that can make your logo look unfinished or fragile.
Ink gain is a reality of the craft. When the squeegee pushes ink through the mesh, the liquid naturally spreads slightly. This is why line weights are a critical part of artwork requirements for screen printing. We suggest a minimum line weight of 1pt for positive prints and slightly more for “knockout” or negative space designs. If your negative space lines are too thin, the surrounding ink will bleed into the gap, effectively closing the detail and making the text unreadable.
To achieve complex looks without increasing your screen count, we utilize halftones. A halftone is a series of dots used to simulate varying shades. By varying the size and density of these dots, we can create the illusion of a gradient or a lighter shade using only one ink color. This technique allows for creative freedom while keeping production efficient. Every color in your design requires a unique physical screen, so mastering halftones is a brilliant way to add depth without adding complexity to the technical setup.
A common mistake in merchandise design is assuming that one file works for every product. It doesn’t. The surface you print on dictates how the ink behaves and how your design should be structured. A logo that looks sharp on a smooth Nike performance polo might need adjustments for the coarse texture of eco-friendly recycled tote bags. Understanding the artwork requirements for screen printing across different substrates is what ensures your brand looks like a leader, not an afterthought.
When we work with performance fabrics like those from Nike or Under Armour, we deal with synthetic fibers that are heat-sensitive. These materials often require specialized inks and lower curing temperatures to prevent “dye migration,” where the fabric’s color bleeds into your print. Conversely, standard cotton is highly absorbent. It drinks up the ink, which can lead to a softer feel but may require a thicker application for vibrancy. If you’re printing on dark garments, we must use a white underbase. Think of this as a primer layer that allows your brand colors to sit on top of the fabric rather than sinking into the dark background.
In the world of professional branding, “blue” is a dangerous word. There are thousands of blues, and your brand likely owns just one. We utilize the Pantone Matching System (PMS) to ensure absolute accuracy. This is a non-negotiable part of the artwork requirements for screen printing when you need your logo to match across various items. For example, your brand colors should look identical whether they appear on a t-shirt or as part of custom employee onboarding kits. Keep in mind that ink can shift slightly depending on the base color of the garment, so providing specific PMS codes allows us to calibrate the mix for a perfect result.
Placement is where creativity meets functionality. A standard left-chest hit on a polo is typically three to four inches wide, while an oversized back print on a hoodie can span twelve inches or more. You must scale your detail accordingly. What works at twelve inches might become a cluttered mess on a custom logo power bank. Tech accessories offer very limited real estate, often requiring a simplified version of your logo to maintain legibility. We always look at the texture of the material too. The weave of a heavy canvas bag can break up very fine lines, so we often recommend bolder strokes for those specific categories.
Ready to see your design come to life on premium corporate gear? Consult with our creative team to ensure your assets are optimized for every material in your collection.
Precision is the heartbeat of our production floor. We don’t just take your file and hit “print.” We treat every asset as a critical component of your brand’s visual legacy. Our workflow is designed to bridge the gap between a digital concept and a tangible, high-quality product. By adhering to strict artwork requirements for screen printing, we ensure that the creative energy you put into your design is fully realized on the final garment or accessory.
Our expert art review is the first line of defense. Our team analyzes your files for the technical nuances we’ve discussed, such as line weights and font outlining. We catch the glitches that automated systems often miss. This human touch is vital when preparing for high-volume runs. When you’re ordering 500 or more custom screen printed t-shirts, even a tiny error in color separation can lead to a massive waste of resources. We eliminate that risk by verifying every path and pixel before the first screen is even burned.
Visualizing how a flat design wraps around a curved Stanley tumbler or sits on the pocket of a Nike polo can be difficult. That’s why our digital proofing process is so essential. We provide a high-fidelity virtual mockup that shows size, placement, and color accuracy. This is your final opportunity to make adjustments before we move into physical production. We prioritize creating promotional items that stand the test of time, and that starts with your explicit “Approval for Print.” This milestone ensures that what you see on your screen is exactly what arrives at your office.
To keep your project moving at the speed of modern business, we’ve distilled the technical standards into a simple checklist. Share this with your design department to ensure a seamless transition from the artboard to the press. Using the latest tools like Adobe Illustrator 2026 ensures your files are compatible with our high-speed automated workflows.
By following these steps, you’re not just ordering merchandise. You’re building brand equity. We’re here to act as your creative consultants, taking the technical burden off your shoulders so you can focus on the impact your brand will make in the world.
Mastering the technical standards for your brand assets is the most effective way to turn a simple logo into a powerful statement of quality. We’ve explored how vector paths, outlined typography, and Pantone precision work together to protect your visual identity across diverse materials. Whether you’re branding high-performance Nike apparel or laser-engraved metal pens, these artwork requirements for screen printing are your roadmap to a flawless finish. Consistency across bulk orders isn’t just a goal; it’s a requirement for modern organizations that value their brand equity.
At SwagStore.NET, we bring over 15 years of corporate branding expertise to every project. We specialize in handling premium brands like Nike, Stanley, and YETI, ensuring your assets look as prestigious as the products they’re on. Every order includes a professional art review to catch technical errors before they reach the press, giving you total peace of mind. Ready to start your bulk order? Get a custom quote from SwagStore.NET today. Let’s build something exceptional together.
Vector files created in Adobe Illustrator (.AI), Encapsulated PostScript (.EPS), or Scalable Vector Graphics (.SVG) are the gold standard. These formats use mathematical paths rather than pixels, which allows your design to be scaled to any size without losing a single ounce of clarity. Using vector files is the most reliable way to satisfy the artwork requirements for screen printing while ensuring a crisp, professional result.
You can use a PNG, but it’s generally reserved for photographic designs or complex illustrations with many colors. The file must be at least 300 DPI at the actual print size to avoid a blurry or jagged finish. For standard corporate logos, we always recommend a vector file because PNGs are difficult to separate into individual ink colors for the physical screens.
Converting fonts to outlines turns your text into a series of vector shapes. This step is vital because it ensures our production software doesn’t substitute your carefully chosen brand typeface with a generic font if we don’t have your specific file. It’s a simple click in your design software that prevents major visual errors and keeps your brand identity intact.
CMYK creates colors by mixing four process inks, while Pantone (PMS) uses specific, premixed ink formulas for absolute precision. For high-stakes corporate branding, Pantone is the superior choice because it guarantees your logo looks identical across different batches and products. Specifying PMS codes is a key part of the artwork requirements for screen printing when you need perfect color matching.
If your art is a low-resolution raster file, it will likely appear pixelated or “fuzzy” when enlarged for a t-shirt or tote bag. Our creative team can often vectorize simple logos for you, but complex designs may lose some of their original character during the conversion. Starting with a high-quality vector file is the best way to avoid extra fees and keep your project on schedule.
There isn’t a hard limit, but most professional designs use between one and six colors. Each color in your design requires its own physical screen and a separate setup on the press. While we can print highly complex designs, keeping your color count focused is a smart way to maintain a clean look while maximizing your budget for large bulk orders.
A digital proof is a virtual mockup that shows exactly how your logo will sit on the final product, including its size and placement. It serves as your final safeguard to verify every detail before we start the production run. For bulk orders, this step is essential because it gives you the confidence that every single unit in the box will match your approved vision.
Fine details can be tricky on textured materials because the ink naturally spreads slightly into the fibers as it cures. We recommend a minimum line weight of 1pt for these surfaces to ensure your design doesn’t “fill in” or become unreadable. If your logo is exceptionally intricate, our art review team will help you simplify the assets to ensure a clean, impactful print on every item.